
This document describes the step-by-step deployment of a SkudoCloud network device to protect and load-balance access to the web service www.secure.skudo.cloud.com. The setup ensures that SKUDONET first analyses all incoming traffic for threats, and only legitimate requests are forwarded to your backend servers.
Network Architecture Summary with SkudoCloud
The following diagram describes how SkudoCloud uses the SKUDONET engine to secure and distribute web traffic for the service https://www.secure.skudo.cloud.com. In this environment, all incoming connections are inspected, filtered, and load-balanced before reaching the backend servers.
🔐 Key design elements:
- Virtual IP (VIP): A public IP address assigned by SkudoCloud (e.g., 159.65.24.67), used as the main entry point for all traffic targeting www.secure.skudo.cloud.com.
- SkudoCloud: A security perimeter that performs deep inspection of all incoming traffic using active security policies, including:
- Detection and blocking of IPs listed in external blacklists or categorised as malicious.
- Advanced TCP-based DDoS mitigation.
- WAF engine enforcing rules to block common web attack patterns.
- Protected URL: HTTPS is used with a valid SSL certificate, ensuring confidentiality and data integrity.
- Clean Traffic: Only legitimate traffic, not identified as malicious, is forwarded from SKUDONET to the backend servers.
- Distributed Backends:
- host1.secure.skudo.cloud.com (Frankfurt)
- host2.secure.skudo.cloud.com (United States)
Both servers listen on port 443 and are managed via load balancing.
Traffic flow summary:
- The client sends a request to the public VIP managed by SkudoCloud.
- The SKUDONET engine accepts the request and performs security checks (blacklists, DDoS, WAF).
- Invalid traffic is dropped at the perimeter.
- Valid requests are decrypted, assigned to a backend node according to the balancing policy, and forwarded securely.
- The backend’s response is returned to the client through the same secure channel.
This architecture ensures high availability, performance, and security, providing global customers with seamless access to the web service.

Step 1: Create a SkudoCloud Service
The following client services will be protected:
The external access point for your users is:
- Public URL: https://www.secure.skudo.cloud.com
- SSL Required: Yes
Service Creation:
- Log in to the SkudoCloud Client Area.
- Deploy a new load balancer.
- Select the service plan: SKUDONET Primary Plan.
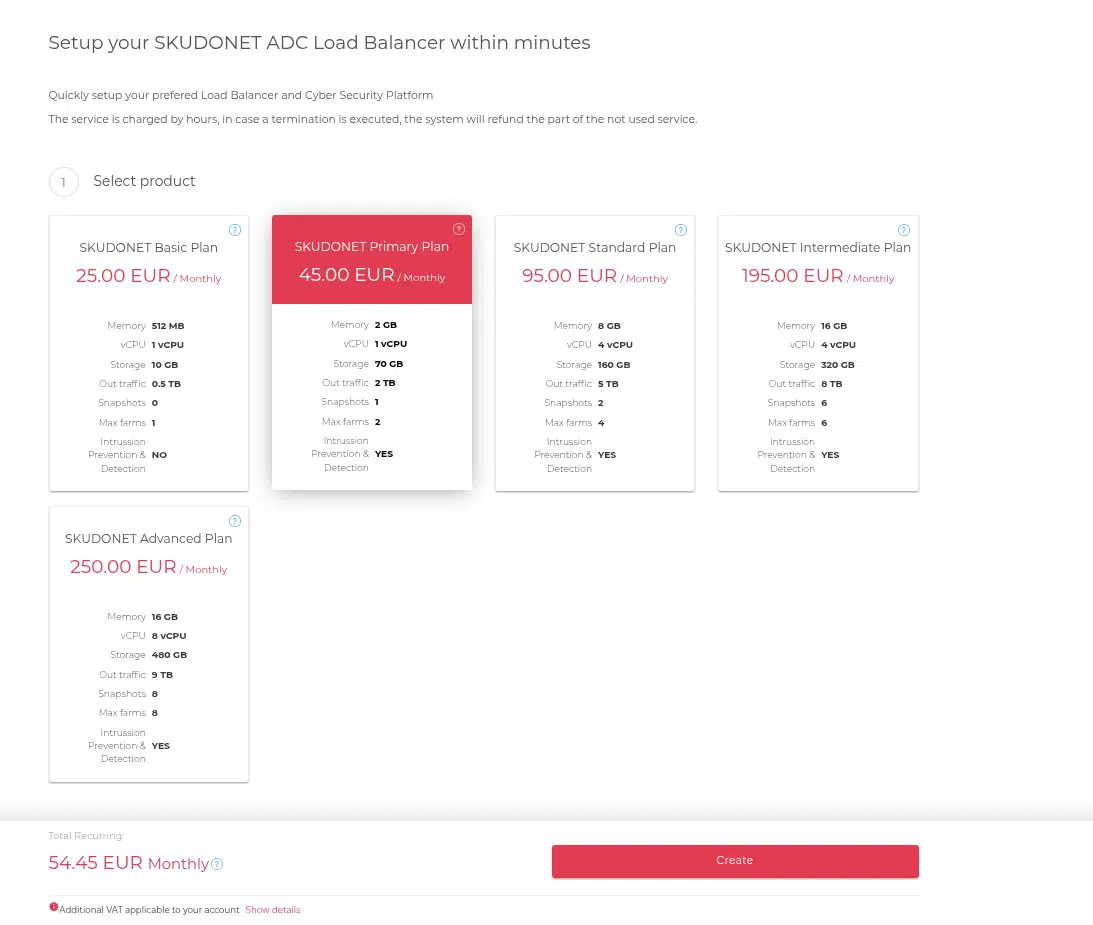
- Choose the datacenter: London1.

- Create a resource named: www-secure.skudo.cloud.

- SkudoCloud assigns a Virtual IP (VIP): 159.65.24.67.
Once the service is billed and provisioned, the SKUDONET network device will be deployed automatically. You can then connect to the device from the Client Area UI to begin the configuration process.
Step 2: Configure HTTPS Load Balancing
The objective is to create an HTTPS load balancing service and a trusted certificate issued by Let’s Encrypt.
Steps to Configure HTTPS Load Balancer:
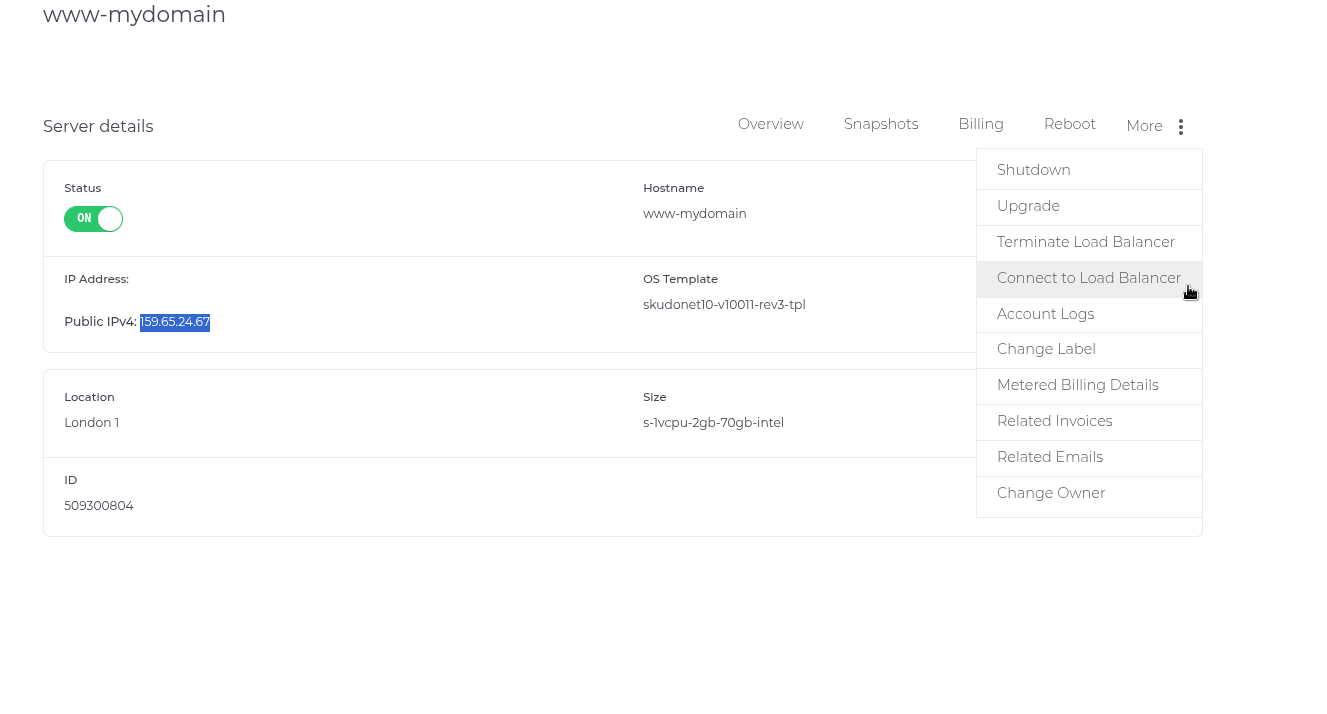
- Access the SKUDONET dashboard for the www-secure.skudo.cloud instance as shown in the image below.
- Once the connection is done, navigate to Local Load Balancer > Farms > Create farm.
- Set up the following:
- Name: frontend-https-www
- Virtual IP: 159.65.24.67
- Virtual Port: 443
- Protocol: HTTP *it will be changed to HTTPS later
Click in Apply, and load the advanced view (upper left button).
- Listener: HTTPS
- Certificate: Create a new certificate in Let’s Encrypt section and specify the domain: www.secure.skudo.cloud.com
- In the Edit farm view, go to Services tab and configure the persistence session, persistence based in IP is commonly used in case your service requires persistence.
- Farmguardian, by default HTTP/S farms use an inherent check_tcp in each request, if you want to improve the backend monitoring, use check_https or create a new farmguardian monitor.
- Persistence (optional, for session affinity):
- Type: Source IP
- Timeout: 1200 seconds
- Under Backends, register the following nodes:
- Save and apply the configuration.
Once the configuration is ready, please update your DNS to point to www.mydomain.com. The resolution should be the VIP assigned 159.65.24.67, which will enable you to start receiving traffic through the Load Balancer.
At this point, HTTPS requests to https://www.secure.skudo.cloud.com will be terminated at SKUDONET, evaluated, and load-balanced between the two backends.
Step 3: Security Policies
Once the HTTPS load balancing service is created, SkudoCloud allows the configuration of advanced security modules to protect your application and infrastructure against a wide range of threats. The protection stack is called Intrusion Prevention and Detection System (IPS / IDS), and it is composed of three layers:
- blocklists based on a preloaded database or RBL
- DDoS
- RBL or DNSBL
- WAF
1. Bot Protection & IP Blacklisting
SKUDONET applies an IP reputation filtering mechanism at the network edge, before inspecting application-layer data. This module does not analyse request content, but instead verifies the source IP address against trusted threat intelligence databases.
Configuration:
- Mode: Enabled by default
- Mechanism:
Incoming client IPs are matched against curated databases of:- Known botnets
- High-risk IPs
- Malicious activity reports
- Tor exit nodes
- Hosting/cloud provider ranges (optional)
- Geo-blocking may also be applied (e.g. block traffic from specific countries)
and more databases updated daily.
Action:
- If the source IP matches a listed entry:
- The connection is immediately blocked.
- No TCP handshake is completed.
- No access to application content occurs.
- Logging of matched IPs is available in the stats and Monitoring section inside the affected Networking device.
Real example:
At this point, we will apply a blocklist bad_peers to the farm to enable the first protection barrier in SkudoCloud, but you can add as many blocklist as you want.
About bad_peers Blacklist
The bad_peers blacklist is a preloaded IP reputation feed included in the skudonet-ipds package. It is designed to block known malicious IP addresses and networks typically associated with:
- Botnets and scanners
- Compromised hosts
- Anonymising services are used for abuse
- Brute-force and credential stuffing attacks
- Proxies known for malicious traffic
This list is regularly updated and curated from trusted public sources. Applying it to a farm provides an additional layer of preventive filtering, reducing exposure to widespread threats before they reach your services.
1. Ensure IPDS Module & Scheduler Are Active
- Navigate to System → Intrussion Prevention and Detection System → Settings
- Ensure a scheduler is configured to check at least once daily
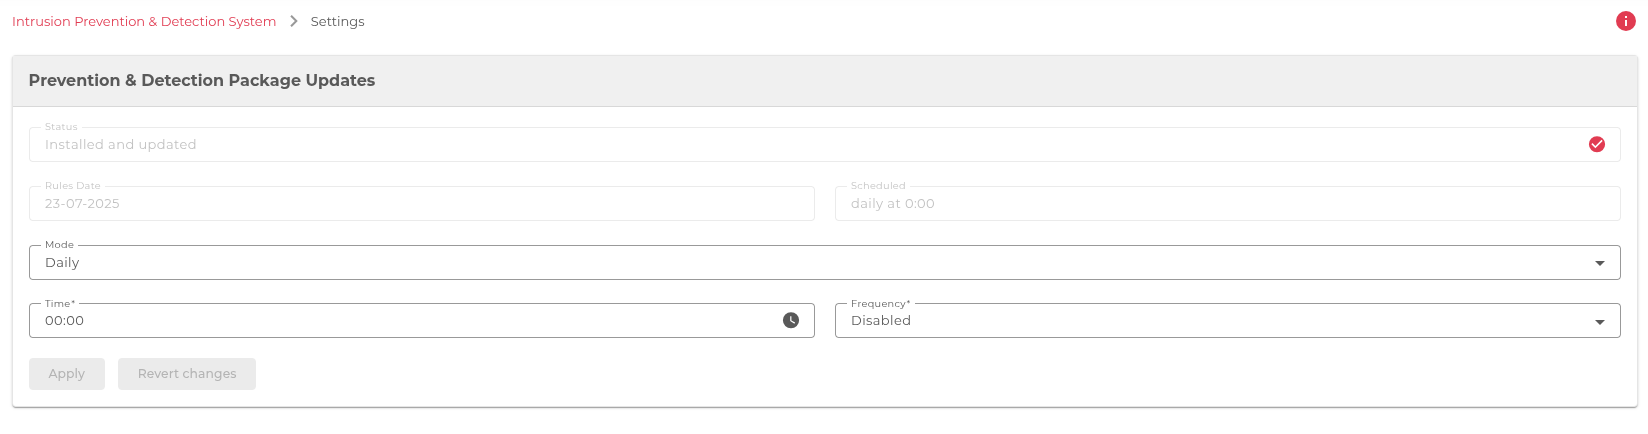
- Choose an Update Mode (e.g., Daily) and time (e.g., 02:00)
- Click Apply
This configures automatic updates of the remote blacklists included in the skudonet-ipds package, such as bad_peers.
2. Verify the Presence of the bad_peers Blacklist
- Go to Intrussion Prevention and Detection System → Blacklists
- In the list, locate the entry named bad_peers
This indicates that the list was downloaded correctly and parsed from the remote feed.
3. Assign bad_peers to the HTTPS Farm
- Click the bad_peers blacklist
- Go to the Farms tab
- Select the farm named frontend-https-www (Virtual IP: 159.65.24.67)
- Move it to the Assigned Farms list
- Click Save
- Back in the main Blacklists view, click Apply to activate the association.
4. Confirm Assignment
- In Intrussion Prevention and Detection System → Blacklists, ensure frontend-https-www is listed in the “Farms Applied” column for bad_peers
5. Monitor Logs for Blocking Events
- Go to System → Logs → Show syslog
- Use filters to isolate logs from farm frontend-https-www and blacklist

Look for log entries like:
Jul 22 10:41:17 skd10k kernel: [11321210.107891] [BL,bad_peers,frontend-https-www] IN=eth0 … SRC=167.86.124.24 DST=159.65.24.67 … - This means traffic from an IP listed in bad_peers was blocked before it reached the service.FALTA TABLA RARA
2. DDoS Mitigation
The SKUDONET engine protects HTTPS services (port 443/TCP) against volumetric and protocol-based denial-of-service attacks. It ensures service continuity by controlling abusive TCP connection behaviour before traffic reaches backend services.
Configuration:
- Mode: Always On
- Protected Ports: 443 (TCP – HTTPS)
- Detection Types:
- SYN floods (excessive TCP handshake attempts)
- Malformed TCP packets
- Abnormal connection rates
Mitigation Rules:
- Per-IP limits: restrict the number of concurrent or new connections from a single source IP
- Per-VIP limits: apply total connection caps to the Virtual IP (VIP) assigned by SkudoCloud
- TCP protocol analysis:
SKUDONET validates TCP behaviour according to standard state transitions (SYN, SYN-ACK, ACK).- If the protocol flow is incorrect or incomplete, the system flags the session as malicious and drops the traffic
- This helps block scanners, spoofed connections, and automated abuse tools that don’t comply with TCP state management
- Connection rate limiting is used as a soft defence before blocking.
Real example:
Here we explain how to create and apply a DoS rule in SKUDONET to mitigate abuse from a single IP by limiting the number of concurrent connections.
Objective: Limit the number of simultaneous TCP connections from a single source IP to the farm frontend-https-www with virtual IP 159.65.24.67.
1.Go to Intrussion Prevention and Detection System → DoS
2.Add a New DoS Rule
Click “Add DoS rule”, and configure the following:
- Rule name: TotalConnLimitPerIP
- Rule type: Total connections limit per source IP
- Connections limit: 30 (or your desired threshold)
💡 This rule drops packets when a single IP tries to open more than 30 concurrent connections.
3.Apply the Rule to the Farm
- Navigate to IPDS → Farm Protection.
- Locate your farm: frontend-https-www.
- Under the DoS section, enable the switch and select the rule TotalConnLimitPerIP from the dropdown.
- Click Apply Changes.
Log Format: Real-World Example
When the threshold is exceeded, you’ll see log entries like the following:
Jul 24 06:21:50 skd10k kernel: [11478440.762356] [DOS,TotalConnLimitPerIP,frontend-https-www]IN=eth0 OUT= MAC=4a:b4:5b:76:6e:e8:fe:00:00:00:01:01:08:00 SRC=8.212.192.120 DST=159.65.24.67 LEN=40 TOS=0x00 PREC=0x00 TTL=51 ID=52651 DF PROTO=TCP SPT=59291 DPT=443 WINDOW=0 RES=0x00 RST URGP=0
Breakdown:
- [DOS,TotalConnLimitPerIP,frontend-https-www]: DoS module tag, rule name, and affected farm.
- SRC=8.212.192.120: Offending IP.
- DST=159.65.24.67: Virtual IP of the farm.
- DPT=443: Destination port (HTTPS).
- PROTO=TCP: Protocol used.
- RST: TCP Reset flag (common when connections are forcibly closed).
Notes
- These logs are kernel-generated and visible in /var/log/messages or via remote syslog if configured.
- You can correlate SRC IPs with firewall blocks or WAF alerts for a deeper analysis of threats.
3.WAF (Web Application Firewall)
SKUDONET includes a Web Application Firewall module designed to inspect application-layer traffic (HTTP/HTTPS) and block malicious requests based on behavioural and signature rules.
Configuration:
- Profile: OWASP Core Ruleset (CRS)
- Scope: Applied to HTTPS frontends (port 443)
- Enabled Rules:
- SQL injection attempts
- Cross-site scripting (XSS)
- Path traversal
- Command injection
- User-agent filtering
- Custom rules can be defined per service.
Action:
- Requests matching a rule are immediately blocked
- A standard HTTP 403 Forbidden response is returned to the client
- No IP banning is performed at this stage
Real Example:
The WAF module in SKUDONET is designed to protect HTTP/HTTPS farms from common web application attacks such as SQL Injection (SQLi), Cross-Site Scripting (XSS), and Remote Code Execution (RCE), among others.
Requirements:
- A HTTP/HTTPS farm (e.g. frontend-https-www)
- A public IP address (e.g. 159.65.24.67)
- WAF module installed (via skudonet-ipds package)
Step-by-Step Configuration to Protect Against SQLi, XSS, and Other Known Attacks
1. Access the WAF Section
IPDS > WAF > Rulesets
2. Enable OWASP CRS Ruleset
- Locate the REQUEST-* and RESPONSE-* Rules, each ruleset is described by the kind of attack it protects.
- Click “Edit”.
- Review the rules included:
- REQUEST-942-APPLICATION-ATTACK-SQLI
- REQUEST-941-APPLICATION-ATTACK-XSS
- REQUEST-932-APPLICATION-ATTACK-RCE
- … and many others.
- Click “Enable” to activate the full ruleset.
3. Assign the WAF Ruleset to Your Farm
Navigate to:
Intrusion Prevention & Detection System > WAF > Rulesets
4. Put in status UP each ruleset you want to use.
Local Load Balancer > Farms > Edit frontend-https-www
Under Prevention & Detection select the WAF rulesets you want to apply to the farm moving the rules from Available WAF rulesets to Enabled WAF rulesets.
Example of WAF Blocking Logs
When an attack is detected, SKUDONET logs an entry like this (following this KB article):
Jul 24 10:31:45 skd10k wafd[4047]: [WAF,owasp_crs,frontend-https-www] ModSecurity: Warning. Matched “Operator `Rx’ with parameter `(?i:(?:select|union|insert|update|delete|drop|create|alter|exec))'” against variable “ARGS:user_input” at REQUEST-942-APPLICATION-ATTACK-SQLI. [file “/etc/modsecurity.d/rules/owasp_crs/REQUEST-942-APPLICATION-ATTACK-SQLI.conf”] [msg “SQL Injection Attack Detected”] [id “942100”] [rev “2”] [severity “CRITICAL”] [tag “application-multi”] [tag “attack-sqli”] [hostname “159.65.24.67”] [uri “/login.php”] [unique_id “172.46.83.11.12345”]
Explanation:
- Matched rule: SQLi pattern
- Variable: ARGS:user_input (user-provided field)
- Rule file: REQUEST-942-APPLICATION-ATTACK-SQLI.conf
- Farm: frontend-https-www
- Source IP: 172.46.83.11
- URI: /login.php
- WAF profile: owasp_crs
