The following article describes how to set up advanced load balancing services with SKUDONET Load Balancer for high availability in Azure Virtual Machine Infrastructure. We are going to describe the procedure to configure a SKUDONET Cluster and configure a TCP load balance profile for load balance HTTP services with a farm of backend servers. The proposed example is the same as in the Advanced Load Balancing and Clustering in Amazon Web Services .
This time, we are going to demonstrate how it could be applied in Azure using Azure services. The following diagram describes the architecture we want to deploy. A web load balancing with SKUDONET Application Delivery Controller in Azure.
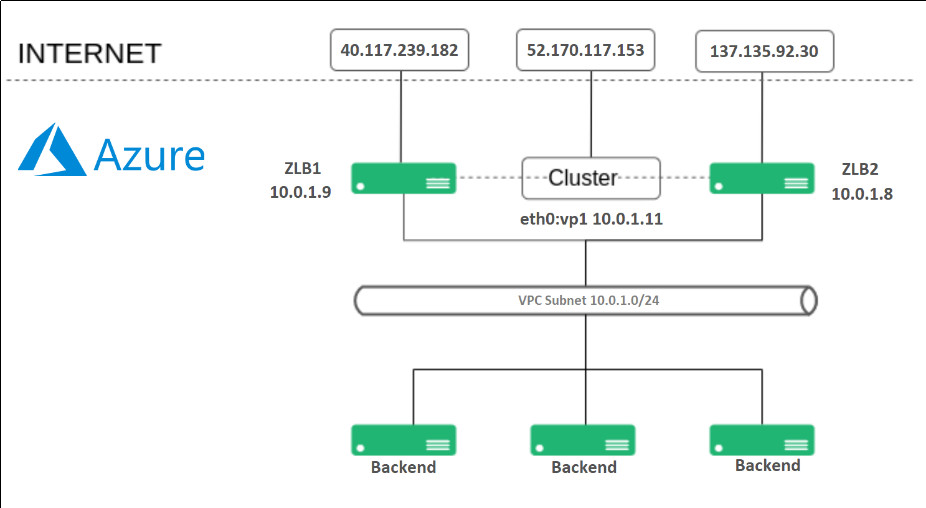
Each SKUDONET ADC machine is configured with one Interface eth0, and each instance is assigned to a Public IP, and also an additional Public IP is assigned to another additional IP through eth0 in the LB1 instance which will be used for load balancing purposes, as described below:
LB1 is assigned to 10.0.1.9 in eth0, this instance will be accessed directly by the Public IP 40.117.239.182
LB2 is assigned to 10.0.1.8 in eth0, this instance will be accessed directly by the Public IP 137.135.92.30
An additional IP is assigned to LB1 and configured in the load balancer with the name eth0:vip1 and IP 10.0.1.11, this IP is used to configure over here one Load Balancing Service and be part of the cluster service, so this IP will work only in one of the SKUDONET instances at a time, which manages the ACTIVE role in the cluster. This internal IP is assigned to a Public IP 52.170.117.153, which is accessed by clients to connect to the published web service.
Finally, the backends are Virtual Machines instances with Linux-based web servers, those instances are part of the load-balanced service where the client connects when requested http://52.170.117.153/.
To implement the architecture shown, we are going to deploy two instances of SKUDONET Load Balancer, which are available in the Azure marketplace. Just click on “create a resource”, on the home page of the Azure portal and search by SKUDONET Load Balancer product.
You can configure each load balancer parameter like any other virtual machine. To do so, you need to consider the following:
For its size, B1ls is sufficient for our purposes.
For each Balancer machine, an associated network interface will be created. Configure its public IP, private network, and security group in the balancer creation form. Keep in mind that this public IP will be needed to access its GUI. Each virtual network is isolated from others, so the selected virtual network must be the same where the other balancer and backends are located.
SKUDONET uses the TCP port 444 for HTTPS web GUI management purposes and the TCP port 22 in SSH for command-line management and clustering purposes. In addition, each Virtual Port used in the load balancer virtual services will be required to be included in your security group. In this case, we have to configure the next inbound rule to allow incoming traffic at the TCP port 80 to get access to our backend HTTP services. These network configurations can be configured in a network security group.
Once the SKUDONET virtual appliances have been deployed and the Instance States are showing Running mode, we can proceed to configure the network.
We have to configure the network interfaces by clicking on them directly from the previous page or looking for them on the home page. Click on IP configurations and make sure you have a configuration that allows http traffic to pass.
In the active node, we need two Ip configurations. A public IP associated with a private IP only (which will be used for management purposes) and a cluster public IP associated with the private IP reserved for our balancing purposes.
After the Public IPs have been configured, the virtual Load Balancers will be accessible as follows:
LB1 will be accessible through https:// 40.117.239.182:444 user root and password the instance id.
LB1 will be accessible through ssh in IP 40.117.239.182, this is configured at Virtual Machine deployment time.
LB2 will be accessible through https:// 137.135.92.30:444 user root and password the instance id.
LB2 will be accessible through ssh in IP 137.135.92.30, this is configured at Virtual Machine deployment time.
If you consider changing the hostname before continuing, please reboot the Virtual Machine instance to apply changes.
When the access to the web GUI is done successfully you will see two important values, the hostname, and the Certificate Key, both pieces of information are unique per Load Balancer and are related to the Activation license; use this information in the following URL as described: https://www.skudonet.com/activate-enterprise-edition-cloud-evaluation/.
Once the form is filled out, the system automatically sends the license to the indicated email. Please, upload the received PEM activation license through the web GUI in each load balancer. Once done, the web GUI is unlocked and all the features are enabled and operational.
Do the same activation procedure in both nodes LB1 and LB2.
Now we are ready to configure the SKUDONET Cluster service, so go to the web panel in LB1 through the assigned public IP https://40.117.239.182:444, section System > Cluster to fill the following form:
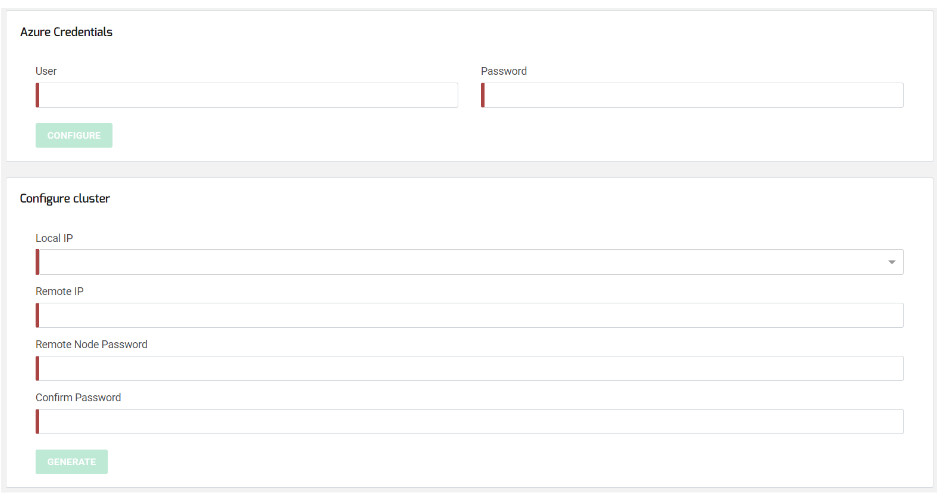
Azure Credentials:
User: your Azure user name.
Password: your Azure password.
Configure cluster:
Local IP: select the IP and NIC of eth0.
Remote IP: enter here the IP of eth0 in node LB2.
Remote Node Password and Confirm Password: enter here the root password for SSH in the other node, by default the instance ID of LB2.
Click on the Generate button and wait a few seconds meanwhile, the node where you run the configuration is going to take the ACTIVE role (LB1) and the other (LB2) is going to take the PASSIVE role.
At this point, the SKUDONET Cluster has been configured in Azure and it is ready to work, so let’s configure our first clustered load-balanced service.
It is necessary to insert Azure credentials on both nodes. So go to the web panel in LB2 through the assigned public IP https:// 137.135.92.30:444 and fill in the Azure Credentials too. It should be clarified that these user credentials will not be stored anywhere, they will only be used to create a direct active user with permission only to modify the network interfaces of the cluster.
Configuring a simple L4 Load balancing for web services
Go to LSLB > Farms > Create Farm with the following parameters.
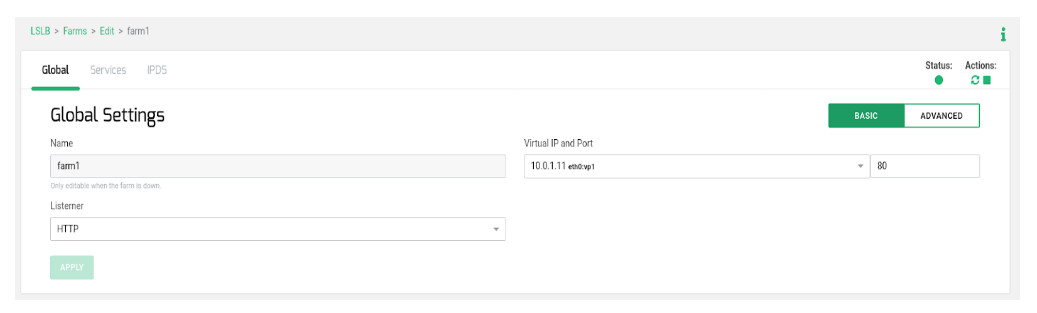
Take into consideration that the used Virtual IP 10.0.1.11 is the Virtual IP configured previously and a resource of the cluster which will be reachable always from the ACTIVE node. Press Create and continue. Configure the section Services as described:
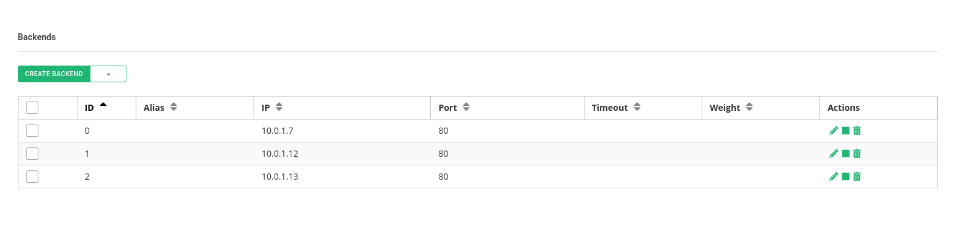
Use IP persistence with a timeout of 60 seconds just in case you need to guarantee that the same client IP will be connected to the same backend over a certain period. Configure the advanced health checks with FarmGuardian. Use check_tcp as a simple health check to verify that the TCP backend port 80 is opened in each backend. Then, add the backend servers’ internal IPs and ports where the real web services are running.
Now test the connection to the Public IP http://52.170.117.153/ assigned to the internal IP 10.0.1.11, the connection will pass through the load balancer using the eth0:vip1 and forwarded to one of the available backends.
Then, force to change the ACTIVE role in the cluster, for example, reboot the node with this role, and the other will take the virtual service and connect again to the public IP. The current and new client connections will be established against the same backend but this time through the new ACTIVE node.
Enjoy advanced load balancing and clustering in Azure with SKUDONET!
